We have been asked again recently about the LightWeight Tiles Roofing System Step by Step Installation. I am going to use this blog to hopefully show you some step by step images with a write up about what was done and how. The images are from one of our approved installers John Sanders who have been so kind to send us the installation process. I hope you find this blog useful. If you have any information that could be included here to help the next customer please feel free to contact us.
Firstly, you have to consider whether this is going to be a complete re-roof or an over roof conversion. Our LightWeight roofing system is suitable for either solution.
So, this first conservatory roof is a complete re roof.
complete re-roof step by step installation

LightWeight Tiles Roofing System Step by Step Installation first step
As you can see the existing roof has been removed and new roof trusses have been installed. If you wanted to you could fit our tiles straight onto the trusses. However, below is also another step you can carry out before installing our tiles.

LightWeight Tiles Roofing System Step by Step Installation ply wood & battens
So, one of our approved installers have installed ply wood on top of the trusses and then installing the 1" x 2" battens on top of this.
The next step would be the insulation.
How and where would you insulate your conservatory roof?
On this particular conservatory roof replacement the installer has insulated from the inside.

LightWeight Tiles Roofing System Step by Step Installation
Completing the insulation stage, the installer has finished it of by plastering over the top of the insulation. This now completes the installation of the insulation. Once the plaster is dry you can decorate it to your preference.

LightWeight Tiles Roofing System Step by Step Installation
To complete the external look of the conservatory our LightWeight Roofing system is now installed, either straight onto the trusses or on to the ply wood and battens.
You can choose the colour of LightWeight Tiles you would like. There are five different granulated finish colours and two smooth finishes. You can have a look at our products here.

LightWeight Tiles Roofing System Step by Step Installation
As you can see our tiles have now been installed. This customer chose one of our most popular granulated colours in Slate Grey.
So, when installing LightWeight Tiles, we recommend starting from the bottom up. One of the benefits of our tiles are the fact they can be walked upon without causing any damage, which makes the installation easier.

LightWeight Tiles Roofing System Step by Step Installation
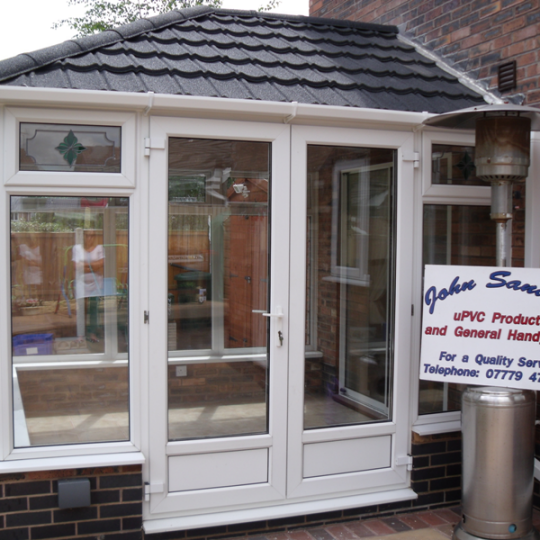
The completed re-roof in Granulated Slate Grey LightWeight Roofing Systems.

LightWeight Tiles Roofing System Step by Step Installation
Our approved installer John Sanders from uPVC Products and General Handyman.
Here is another image of a Victorian conservatory roof where the customer has over roofed saving time and money on removing the existing roof. As you will see from the below image our LightWeight roofing tiles have been installed on the recommended 2" x 1" battens which have been fixed down to the original roof.

LightWeight Tiles Roofing System Step by Step Installation
Here, this customers conservatory roof they have insulated on the outside then fixed the battens and then installed our tiles on to the battens. The insulation this customer has used is called Celotex. It is quite commonly used for insulating buildings such as conservatories.

LightWeight Tiles Roofing System Step by Step Installation